Follow the instructions below to complete your ACE chatbot setup.
Last Update:
September 17, 2025
Fenix AI
Implementation
Install the ACE Chatbot on Your Property Website
These instructions provide an overview of how to install the ACE chatbot on your property website. The ACE chatbot interface is encapsulated in a JavaScript file that calls a service on LeaseHawk’s servers. You can implement this JavaScript with Google Tag Manager or directly on your website.
Option 1: Install the ACE Chatbot with Google Tag Manager
Log into your Google Tag Manager account.
Select the Tags page in the left-side menu.
Select New to add a new tag.
Give your tag a name. For example, you can name it: ACE Chatbot.
In the Tag Configuration box, click on Choose a tag type to begin setup.
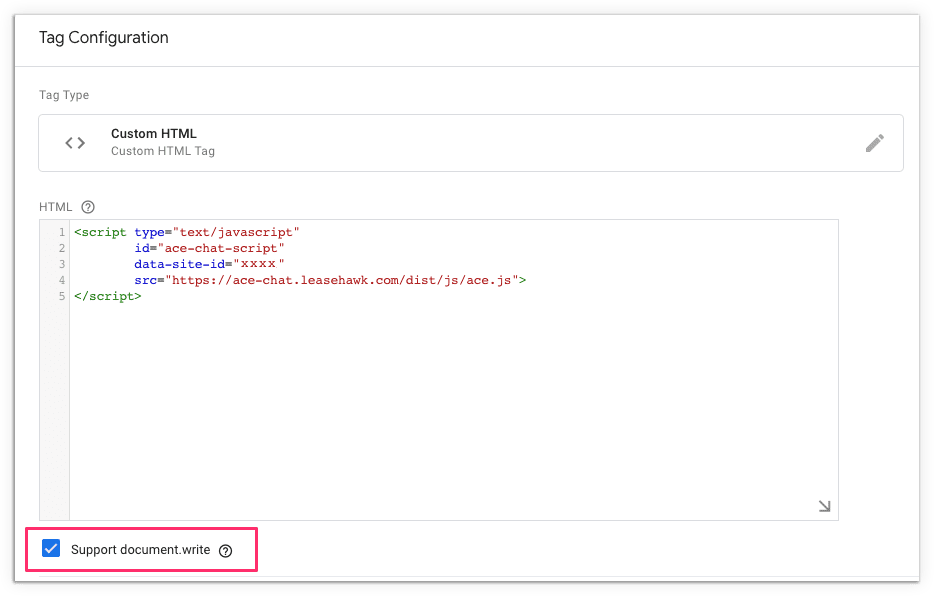
Select Custom HTML.
Copy the code snippet below, and paste it into the HTML box in Google Tag Manager.
After you have pasted the code snippet, find the placeholder for ChatbotID and insert your ACE Chatbot ID for the correct property provided by LeaseHawk. If you are having trouble finding your Chatbot ID, please email support@leasehawk.com.
Optionally, you may further customize how the ACE chatbot appears on your website by editing the code snippet. See the section, "Additional Options" below for code customizations that you can add in your code snippet.
Next, check the checkbox for Support document.write
Select the Triggering box, and choose your trigger. We recommend setting your script to fire on all pages of your website by select the + at the top of the page, then click Page View > All Page Views.
Click Save to add the tag to your workspace.
Once your tag has been added to your workspace, click Publish at the top of the page to activate the script on your website.
Option 2: Install the ACE Chatbot Directly on Your Property Website
Add the code snippet to the <head> of your website.
Locate the "ChatbotID" placeholder in the code snippet, and replace it with your ACE Chatbot ID for the correct property provided by LeaseHawk. If you are having trouble finding your Chatbot ID, please email support@leasehawk.com.
Optionally, you may further customize how the ACE chatbot appears on your website by editing the code snippet. See the section, "Additional Options" below for code customizations that you can add in your code snippet.
Additional Options
1. Change Height and/or Width of the Chatbot Window
Add the following attributes to the chatbot snippet and update the number of pixels to position the floating action button.
data-width="400px"
data-height="700px"
Code-Snippet Example:
2. Position Chatbot Floating Action Button
Add the following attributes to the chatbot snippet and update the number of pixels to position the floating action button.
data-position-bottom="99px" or data-position-top="99px"
data-position-right="99px" or data-position-left="99px"
Code-Snippet Example:
3. Position Chatbot Open Window
Add the following attributes to the chatbot snippet and update the number of pixels to position the floating action button.
data-open-position-bottom="99px" or data-open-position-top="99px"
data-open-position-right="99px" or data-open-position-left="99px"
Code-Snippet Example:
4. Open/Close Chatbot Externally
Use the following JavaScript function to toggle the chatbot open and closed
Use the instructions below when you want to exclude the chatboton a few pages when applied globally. If you only want to include the chatbot on a few pages, then it is best to insert the original chatbot script on the individual pages instead of applying it globally.
Take the example script below and add your chatbot ID.
Add the page paths you want to exclude the chatbot on in this section of the script
if (window.location.pathname == "/somePath" || "/someOtherPath/1") { ...
You can define multiple pages by separating them with ||
If you need to exclude all pages within a path or with a similar name you can use .includes("/path") if ( window.location.pathname == "/" || window.location.pathname.includes("/demo")) {
Make sure your page paths are wrapped in "quotes"
Do not include the base domain when defining your excluded pages. https://domain/pagepath/1
Replace the original chatbot script with the new script on your website. Apply this globally.
Code-Snippet Example:
6. Custom CSS Styling
Please contact your LeaseHawk Client Success Manager or support@leasehawk.com for assistance with custom CSS styling, such as:
CSS Styling Sheets
Chatbot Screen Size CSS Classes
CSS Script for correcting left-side chatbot position (as seen below)
7. Declare Where Chatbot Gets Inserted
You may declare where the ACE chatbot gets inserted on a webpage from the chatbot script. This allows you to specify where on the page the chatbot is placed. For example, when "data-chatbot-insert-target-id=" is added to the chatbot script, the chatbot will be inserted to that location in the HTML.
Code-Snippet Example:
8. Chat to Text
Drive more conversions with text and give renters greater flexibility to communicate on their preferred channel. With chat to text, renters can start a text conversation right from the ACE chatbot. Note: sites must have the text channel activated. Click here or below for a demo of this feature.
This guide provides instructions on how to integrate ACE, your virtual leasing assistant, with your PMS (Property Management System) for access to pricing and availability data. Available PMSs include Vaultware, Yardi, RealPage, MRI and ResMan.
ACE is your AI-powered virtual leasing assistant and is your back up for busy days or after-hours calls. She answers common leasing questions, creates guest cards and schedules appointments. Learn how ACE notifies you through email or the LeaseHawk CRM.
ACE, your virtual leasing assistant, can chat with your prospects from nearly any website. Follow this guide to learn how to setup your own ACE™ Virtual Leasing Assistant chatbot URL for placing on property listings, social media profiles, and email.